
This is the second post in a multi-part blog series on Kubernetes DevOps using Azure. I am co-authoring this series with the help of my colleague at Microsoft, Daniel Selman. We recently worked on the Kubernetes project together and thought to share our learnings.
In the last post, you got to better understand the application that was going to be deployed in the Kubernetes cluster. In this post, you will learn about the tool called “Helm”.
Part I: Introduction to the Historic Events Microservice
Part II: Getting started with Helm
Part III: VSTS Build (Helm package + containerization of application)
Part IV: VSTS Release (using Helm)
Part V: Lessons Learned – When things go wrong!
So what is Helm?
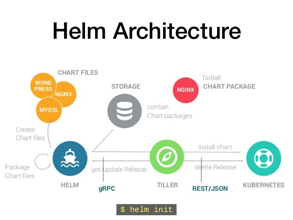
Source: https://www.slideshare.net/alexLM/helm-application-deployment-management-for-kubernetes
Helm can be used to empower your dev-ops workflows in two distinct ways. First, it allows for the parameterization of YAML files for K8s deployments. This means that many people can utilize YAML from a shared source without modifying the file itself. Instead, they can pass their individual values at runtime (e.g. a username for a configmap).
For example, to deploy and configure the MySQL Helm Chart you would run the following command:
helm install --name my-release stable/mysql
No more diving into the YAML to get your deployment up and running. Pretty convenient right?
Second, it provides a standardized way of distributing and implementing all the associated YAML for an application. Microservices are cool (minimizing dependencies makes everyone’s lives easier), but they also result in many different containers being necessary to get an application running. Kubernetes augments this sprawl by introducing additional constructs that need to be defined (services, configmaps, secrets). As a result, even basic three tier applications can require almost a dozen k8s constructs (and likely a dozen different YAML files). Even someone who knows the application like the back of their hand likely wouldn’t know how and in what order to deploy these different files.
Helm handles that for you!.
Instead of running a dozen commands to deploy the different components of your application, you throw all your YAML into the templates folder of your chart (we’ll get to that later) and Helm will handle it for you.
Quick note on the YAML we’re working with
A previous blog post went through the process of containerizing our history application. The purpose of this blog is to cover the helm piece of the puzzle but to give you an idea of what we are starting with from a vanilla YAML perspective.
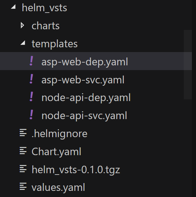
We’ve got four files total for the application- asp-web-dep, asp-web-svc, node-api-dep, node api-svc. All of the containers are being pulled from the Azure Container Registry. I’ll include the four files here for reference.
asp-web-dep.yaml
apiVersion: apps/v1beta1
kind: Deployment
metadata:
  name: aspcoreweb-dep
spec:
  replicas: 1
  template:
    metadata:
      labels:
        app: aspcoreweb
        tier: frontend
        track: stable
    spec:
      containers:
        - name: demowebapp
          image: "rzdockerregistry.azurecr.io/aspcoreweb:BuildNumber"
          ports:
            - name: http
              containerPort: 80
      imagePullSecrets:
        - name: sec
asp-web-svc.yaml
kind: Service
apiVersion: v1
metadata:
  name: aspcoreweb-svc
spec:
  selector:
    app: aspcoreweb
    tier: frontend
  ports:
    - protocol: "TCP"
      port: 80
      targetPort: 80
  type: LoadBalancer
node-api-dep.yaml
kind: Deployment
metadata:
  name: nodeapi-dep
spec:
  replicas: 2
  template:
    metadata:
      labels:
        app: nodeapi
        tier: backend
        track: stable
    spec:
      containers:
        - name: nodeapi
          image: "rzdockerregistry.azurecr.io/nodeapi:BuildNumber"
          env:
            - name: url
              value: https://rzshared.blob.core.windows.net/data
          ports:
            - name: http
              containerPort: 8080
      imagePullSecrets:
        - name: sec
node-api-svc.yaml
kind: Service
apiVersion: v1
metadata:
  name: nodeapi-dep
spec:
  selector:
    app: nodeapi
    tier: backend
  ports:
    - protocol: TCP
      port: 8080
      targetPort: 8080
Lets make a chart
If you haven’t yet, get kubectl and helm installed on your machine and have your kubectl configured to point at a Kubernetes Cluster (we’ll be using AKS, which you can get started with here). Helm uses your kube config so it should play nice with your cluster out of the box.
Helm at the time of writing this requires Tiller, the server-side component. Run the following command to initialize tiller on your cluster:
helm init
Next, let’s scaffold a chart. When you run a simple Helm create [name] command it will create a basic Nginx chart, which we will replace with the components of our application. First, run the helm create command:
helm create [chart_name]
This will create a new directory with all the elements of the helm chart.
This blog isn’t going to cover all the elements of a Helm chart, but instead focus the templates folder and the values.yaml file. The templates folder is where your YAML will be placed. Its currently populated by the nginx files, so you’ll want to delete all of the content in this folder and replace it with the yaml for your application.
Similarly, delete the content (not the file) of values.yaml. Let’s start from a blank slate and replace it with the following values. The buildNumber will be used later on for the VSTS Pipeline and the imagePullSecret will be used to specify the… well imagePullSecret. Don’t worry about the specific values as these can be updated later on.
buildNumber: BuildNumber
imagePullSecret: acr
We will make one modification to the YAML files, however. Under the hood, helm has a “Release” object which contains information about the deployment of the helm chart. Specifically, release.name provides a unique identifier for your chart so that you can deploy one chart many times to a cluster without errors associated with overlapping names. We’ve added in a reference to the release name attribute in each of the yaml files as such:
  name: {{ .Release.Name }}-aspcoreweb-dep
  name: {{ .Release.Name }}-aspcoreweb-svc
  name: {{ .Release.Name }}-nodeapi-dep
  name: {{ .Release.Name }}-nodeapi-dep
Lets recap. We’ve initialized tiller on our cluster, scaffolded a helm chart, and threw our (mostly) vanilla YAML files in the templates folder.
Our last step is to package it up for ease of distribution. Navigate to the directory base directory of your helm chart and run the following command:
helm package
Now your chart can be distributed and installed on your cluster using helm install:
helm install [chart_name]
Now that we have some familiarity with the application, Kubernetes, and helm, we are going to transition to VSTS to handle the Build and Release process from code to chart deployment over the next few blog posts, so make sure to check back as we continue this series.