During recent customer engagement there was a discussion around client certificate [a.k.a tls mutual] authentication and how to use it with asp.net web api that is hosted on azure as a azure api app. Apparently there is an article that covers this topic for web apps hosted in azure but it cannot be used as-is for web api as there are some differences on how to get the certificate inside a web api versus web app. I also notice that it does not disucss how to actually make a call to web api from a client app e.g. console or web application etc. and actually demonstrate how to pass client certificate as part of the request. This post is going to cover exactly these two topics:
1. Demonstrate how to capture a client certificate inside the web api hosted on azure as a azure api app.
2. Demostarate client application making a call to secure web api by passing a client certificate in the header. We will use both a browser and a sample console app but principal remains same and can be applied to other type of applications including a web application.
On a side note if you are thinking why on earth you will need to use client certificate based authentication today you’re not alone. In fact this stackexchange thread presents a good infromation on the topic.
What are Client Certificates?
Lets get some very basic information out of our way about client certificates. Will trying to keep it as short and concise as possible. If you already aware of what they and how they work then you may want to skip this section.
Client certificate are essentially of type X509 certificate. They are use by a client which can be user or application to establish its identity. Example of client application can be a windows service, console application or even a web application running on a web server. You may ask how client certificate is different from server certificate and why can’t we just use server certificate for both purposes? Actually you can and its technically possible to have a certificate that can serve both as client and server certificate but practically that usage is less common. This actually can be explain when you understand indented use case for both type of certificates. Server certificate is used by the server to tell the client that the identity of the accessed system [e.g. a website] is actually what it says it is and should be trusted. Thats why inside the server certificate you find attributes that are related to for example a domain name that web site is hosted on [www.contoso.com or *.contoso.com]. When browser do all the tls based handshake behind the scene it does verify everything it has to to make sure the certificate can be trusted. Thats why browsers have already store many trusted certificates from sources like Godaddy, VeriSign etc. The Client certificates does similar thing for clients by telling a server that “I am giving you this certificate and you should trust me with it”. Server actually has to do similar activities as browser does with server certificate to ensure that certificate presented by the client is not spoofed, temper with and actually is a valid certificate.
To sum up, following are they key points to remember related to client certifiactes:
1. Client certifiacte are different from server certificate in their indented usage.
2. Client certificates need both public and private key to work. This is important consideration particularly when you are troubleshooting a scenario when server is consistently declining a certificate presented to it.
3. How do I determine if certficate I got is a client or server certificate? Its rather simple. Follow the following steps:
- Locate the certificate and double click to open it.
- On general tab under certificate information section for the client certificate it will say “Proves the identity of a remote computer”. Alternatively for server certificate it will say “Ensures the identity of a remote computer“. Pay attention to work prove versus ensure!
- On Details tab scroll until you see field “Enhanced Key Usage”. For the client certificate the value of this field is “Client Authentication (1.3.6.1.5.5.7.3.2)” and for server certificate its “Server Authentication (1.3.6.1.5.5.7.3.1)”
Web Api & Client App Code Download
Go ahead and download the complete source code including visual studio projects from Github repo: AzureWebApiClientCertAuthSample
- WebApiWithClientCertAuth: This is a web api project that reads client certificate from incoming request. You also publish the web api to azure as a api app.
- WebApiClient: This is a .net console application that call the web api in #1. It also pass client certificate as part of the api request.
- Certificate: Not a project but a folder containing self signed client certificate as a .pfx file.
- AzureWebApiClientCertAuthSample: Visual studio solution file that aggregates all of the above.
Install Self Signed Certificate
I choose to install the self signed certificate in the certificate store on the local machine. You can do the same by opening up the mmc console [type mmc in run windows and press enter].
- From file menu select add/remote snap-ins
- Select certificates from the snap-in list
- Choose computer account and press next
- Press finish and then press ok
- Expand certificates node and then expand personal folder
- Right click the certificates node and select all tasks option and then select import
- Press next and locate the certificate file and press next
- Provide the password [use password.txt file available as part of download inside certificate folder]
- Keep pressing next and finally press finish
- You should now have a client certificate ready to be used
If you want to create your own self signed certificate then you can use the new-selfsignedcertifacte poweshell cmdlet. Please note that although this cmdlet is available in different versions of windows server platform the -textextension parameter is only available in windows server 2016 [currently in technical preview 4]
New-SelfSignedCertificate -Type Custom -Subject "CN=DO_NOT_USE_IN_PRODUCTION" -TextExtension @("2.5.29.37={text}1.3.6.1.5.5.7.3.2","2.5.29.17={text}upn=joe@contoso.com") -KeyUsage DigitalSignature -KeyAlgorithm RSA -KeyLength 2048 -CertStoreLocation "Cert:\LocalMachine\My"
Web API & Client Certificate Authentication
I basically created a plain vanilla asp.net 4.5 web api project using visual studio 2015. If you want to create you own then it should work too. Just pay attention to code that I’ve added which is really minimal but important. Other than that there is nothing really special about the visual studio project.
Lets quickly run the application locally by pressing f5. You should see browser navigating to http://localhost:3959 and presenting you the usual default asp.net page. Lets make sure everything else is working as expected by browsing to following url:
http://localhost:3959/api/values
You should get the json response similar to following.
["Connection : Keep-Alive","Accept : text/html","Accept-Encoding : gzip","Accept-Language : en-US","Host : localhost:3959","User-Agent : Mozilla/5.0"]
If you’re using internet explorer the default behavior is that it may just download the file but for chrome and firefox they typically show the json in the browser itself. So, what’s exactly going on? Lets see on the code to figure it out. Open the value controller.cs file present under controller folder inside the web api project.
public IEnumerable<string> Get()
{
ProcessClientCertificate pCert = new ProcessClientCertificate();
System.Net.Http.Headers.HttpRequestHeaders headers = this.Request.Headers;
List<string> lst = new List<string>();
foreach (var header in headers)
{
if (headers.Contains(header.Key))
{
string token = headers.GetValues(header.Key).First();
if (!string.IsNullOrEmpty(token))
{
lst.Add(header.Key + " : " + token);
}
}
else
{
lst.Add(header.Key + " : No value ");
}
}
if (headers.Contains("X-ARR-ClientCert"))
{
string token = headers.GetValues("X-ARR-ClientCert").First();
X509Certificate2 cert = pCert.GetClientCertificateFromHeader(token);
return new string[] { cert.Thumbprint, cert.Issuer };
}
return lst.ToArray<string>();
}
This was the method that was executed and the reason behind the retuned json. It start by creating an object of custom class to handle the incoming cert [more on it in a moment] but after it get the cert it gather all the headers that came as part of incomming request. These are http headers and are represented by type
System.Net.Http.Headers.HttpRequestHeaders
Why we need headers? because the certificate will be inside a header with the key
X-ARR-ClientCert
Also worth mentioning that certificate is base64 encoded.
I just put them inside a list object with a key and value of every header separated by a colon character per list item. If you notice the json you received it was exactly that.But where is the client certificate part? Notice on line 23 there is a if condition checking for the header that should be carrying client certificate. And if it does find it then it goes and call
GetClientCertificateFromHeader
method which takes the takes the base64 encoded client certificate value coming out of header as an input. The actual code is located inside file
//ProcessClientCertificate.cs
public X509Certificate2 GetClientCertificateFromHeader(string certHeader)
{
   X509Certificate2 certificate = null;
   if (!String.IsNullOrEmpty(certHeader))
   {
      byte[] clientCertBytes = Convert.FromBase64String(certHeader);
      certificate = new X509Certificate2(clientCertBytes);
   }
   return certificate;
}
It basically read the base64 string then converts it to bytes array and creates a certificate of type [chsarp] X509Certifacte2[/csharp]. This certificate has all the attributes that you expect in a x509 cert including subject, issuer, thumbprint etc.
Going back to the actual api method notice that in case of certificate is found in the header it simply return the string array with certificate thumbprint and its issuer. But you never got either of these in the json. Why is that? lets cover that next.
Publishing Web API to Azure & Enabling Client Certificate Authentication
Till this point everything was running locally because visual studio is hosting the web api on iis express. In order for client authentication to work following needs to happen:
1. Client and server must establish tls channel
2. Client need to send the client certificate
3. Server need to read the client certificate
For #1 host the api on a website that has a support of https. With azure api app that happens by default. #2 is simple enough too, you can use any modern browser like internet export, chrome, firefox etc that has built in support for presenting you with an option to choose a client certificate present on the machine and then send that to server over tls channel. Finally, #3 we already got it covered. Remember the part where we read the certificate from the header and it was in base64 encoded.
Just to add few points: Depending on your hosting preference you may not always get the certificate inside X-ARR-ClientCert header. For azure api app hosting web api its inside that header because thats where underlying platform using application request routing places it. Typically for web api you should use method
Request.GetRequestContext().ClientCertificate
to access client certificate.
Let’s go ahead and publish the web api to azure platform as api app. I won’t cover the actual steps about how to publish it as they are very well documented. Do take a note of location where your api app is located and its resource group. For my deployment location was “East US 2” and resource group was “WebApiGroup”. We will need this information momentarily.
[NOTE] Its absolutely critical that you choose a paid app service plan for api app. By default it is set to free plan and that does not allow you to enable client certificate authentication! You may want to consult this article for more details.Also, you can change the app service plan after deployment. At this point you should have app service plan updated to something other than free.
We should now do a quick test to see how the web api is doing by visit url:
http://[YOUR WEB SITE NAME].azurewebsites.net/api/values
The response will be a json and actually should be similar to json that you receive earlier when tested the api locally. It should have headers but nothing related to certificate. I promise, on last setting and we are all set for client authentication.
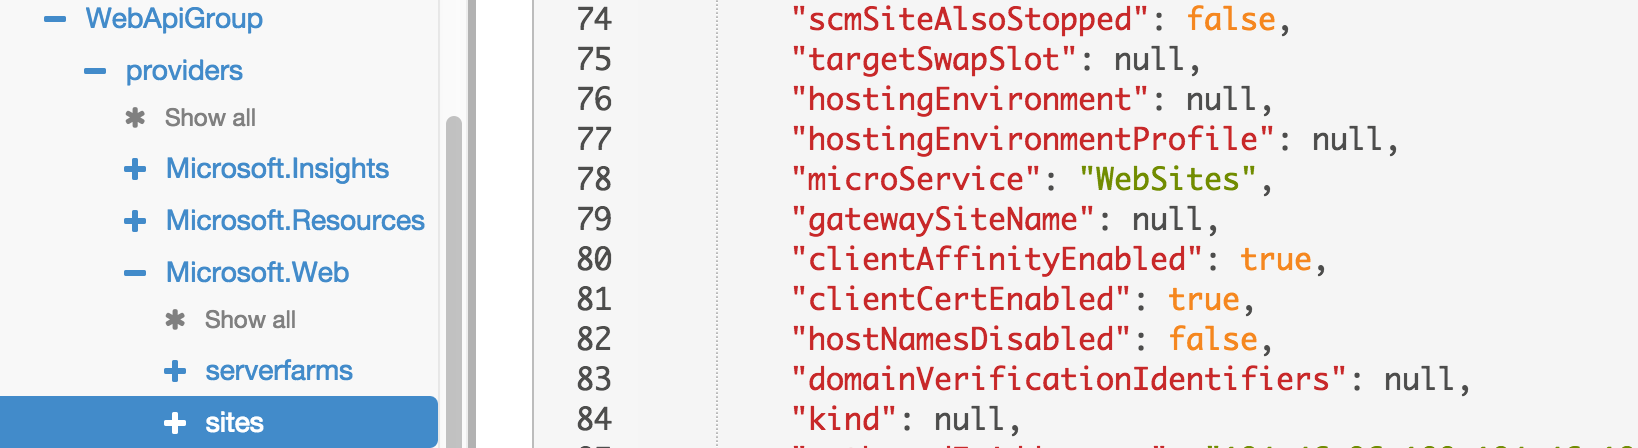
We now enable client certificate authentication on published web api. At the time of writing it is bit more tedious than it should be because there is no provision for it in the azure portal or azure powershell cmdlets. You have atleast two options to make it happen. You can choose whichever makes more sense to you but option 1 is simple and does not require any installation so its a zero touch solution.
Option 1: The way I did it is by using azure resource explorer which provide simple user interface to read/update the properties of a azure resource. Here are are steps you need to follow:
- After login to the azure resource explorer change the default option from the top pane from “Read” to “Read/Write”
- From left hand side tree view expand the subscription node and then expand resourceGroups node
- Expand the resource group which contains the web api [e.g. webApiGroup] you like enable client certificate authentication
- Expand “Microsoft.Web” and then expand “sites” node
- Select “Edit” option present under data tab located next to “GET” option.
- Notice the right hand side pane has a json listing. Locate attribute “clientCertEnabled” and double click on value “false” to select it
- Change value from “false” to “true”
- Save the changes by pressing “PUT” button.
Finally the json should look like similar to the screen shot below. Pay attention to line 81 showing clentcertenabled attribute with value true. Click on the image to view it in full size.
Option 2: If for some reason you don’t want to use azure resource explorer then you can use a tool like arm client. You do have to install it first and once you’re finished create a json file like the one shown below and save it on the disk. I save it at c:\files\input.json
{ "location": "East US 2","properties":{"clientCertEnabled": true } }
Remember we noted location of our web app earlier, this is where we need it.
Finally prepare the command for the arm client tool:
armclient PUT subscriptions/{Subscription Id}/resourcegroups/{Resource Group Name}/providers/Microsoft.Web/sites/{Website Name}?api-version=2015-04-01 @c:\files\input.json -verbose
You will need to provide the values inside the braces. You can simply gather them by going to azure portal and then select the web app and then expand the blade and select the resource group property link. Now look at the url and notice that it basically has values for all the fields you need for the command above. Copy them form url and paste them into their respectively places inside the command above.
Finally run the command and make sure that it complete successfully.
Testing Client Certificate Authentication Using Browser
You must be impatiently waiting to test this all out. I can’t blame you so lets jump right into it. I will demonstrate the call using internet explorer [v11] but also have tested the process sucessfully using chrome[v48.0.2564.116] and firefox[44.0.2]. Also, I have all of them running on windows server 2012 r2.
1. Launch the internet explorer
- Goto settings and then select internet options
- From the content tab select certificates
- Press import and then select the client certificate [you have downloaded it earlier]. if you don’t see the certificate then make sure you have selected “all files” option from the dropdown on bottom right.
- Press next and provide the password
- Keep pressing next till you see finish and then press it to complete the import process
- You should see import was successful message.
- Close all the dialogs
2. Browse to the web app using internet explorer. Note that you are using https and not http
https://[YOUR WEB SITE NAME].azurewebsites.net/api/values
You should now see a windows security dialog asking you to select the client certificate so browser can send it to the web app. Select the one you imported earlier as highlighted in the figure below. Click on the image to view it in full size.
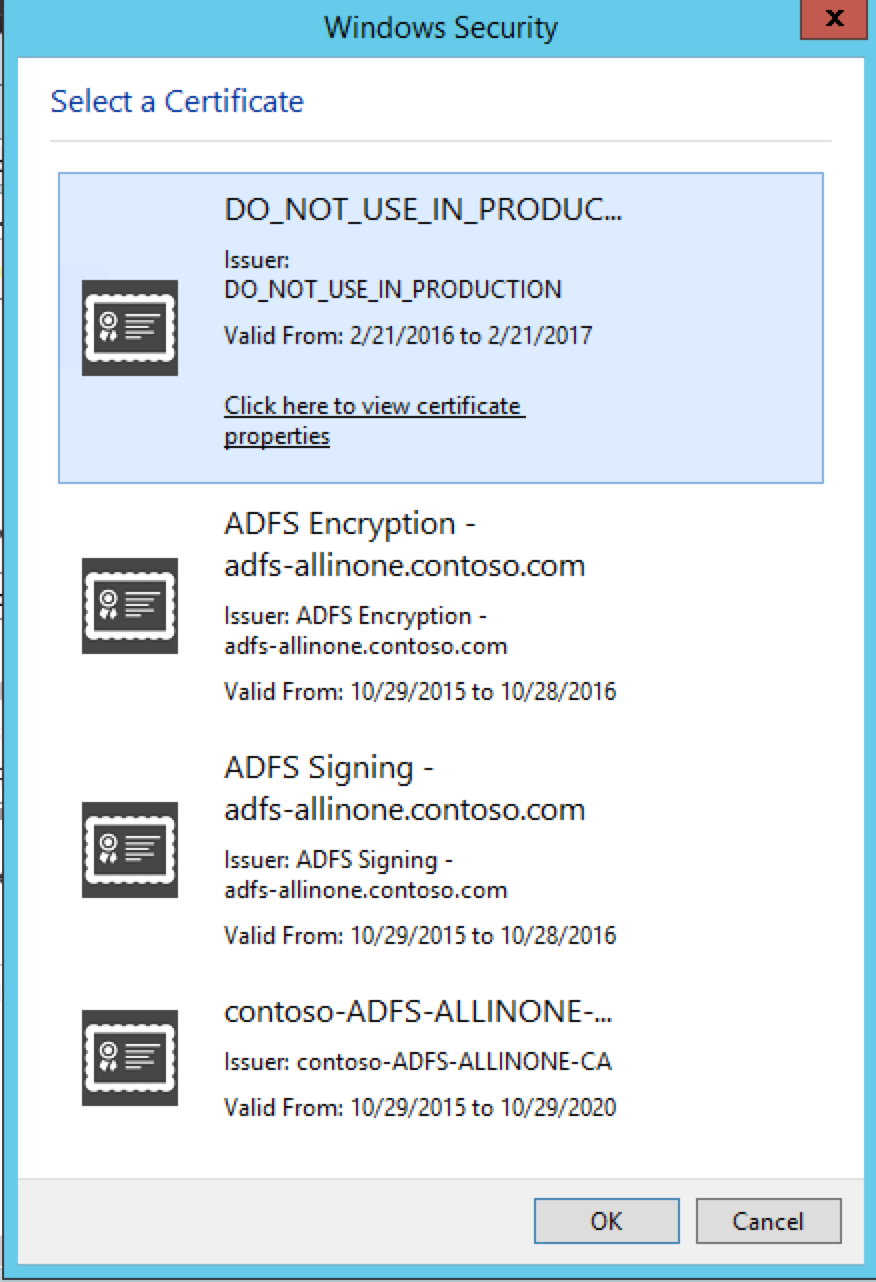
You should now receive the json but this time it has thumbprint and name of the issuer in it!
["836D19627899F09F5EE60D71B2B9823201321E08","CN=DO_NOT_USE_IN_PRODUCTION"]
Testing Client Certificate Authentication Using Console Application
In previous section we already did a round of testing using the browser. What happen when instead of browser you like to make a call to the web api using an application like windows service, console application, task scheduler, web application etc. The process is generally same for all these applications. I’ve provided sample console application as part of download. Open the webapi-client project in visual studio. We now look into the code that call the web api programmatically and also pass client certificate as part of the request.
Lets take a look at CallHttpsApi method that does most of the work. Its the only method that is called by main() method located inside program.cs file.
 static void CallHttpsApi()
        {
            Console.WriteLine("Enter full path to certificate file (.pfx)");
            string certFile = Console.ReadLine();
            Console.WriteLine("Enter password for the certificate");
            string certPassword = Console.ReadLine();
            Console.WriteLine();

            string baseWebUrl = "webapiwithclientcertauth.azurewebsites.net";
            string url = string.Format("https://{0}/api/values",baseWebUrl);
            HttpWebRequest req = (HttpWebRequest)WebRequest.Create(url);
            req.ClientCertificates.Add(GetCertFromFile(certFile,certPassword));
            HttpWebResponse resp = (HttpWebResponse)req.GetResponse();
            using (var readStream = new StreamReader(resp.GetResponseStream()))
            {
                Console.WriteLine(readStream.ReadToEnd());
            }

            Console.ReadLine();
        }
It start by asking the path to client certificate file in .pfx format followed by the password. Both the certificate and password are provided and inside certificate folder. Next create the url for the api to call.You need to replace the baseWebUrl with the you azure api app. We then create HttpWebRequest object and add client certificate to its ClientCertificates collection.
The GetCertFromFile a custom utility method that actually read the certificate from file as shown below:
        static X509Certificate2 GetCertFromFile(string certPath, string certPassword)
        {

            X509Certificate2 cert = new X509Certificate2();
            cert.Import(certPath, certPassword, X509KeyStorageFlags.PersistKeySet);

            return cert;
        }
One a side note you can also get the certificate from the certificate store by using attributes like certificate thumbprint. I actually added a custom method GetCertByThumbprint so take a look at that. I won’t discuss it here though.
Finally we create HttpWebResponse object and then read the response through StreamReader.
Run the console application.Provide it with the full path to client certificate and password. You should see a successful call to web api and json in the response including certificate thumbprint and common name [cn] in it. Screen shot below. Click on the image to view it in full size.
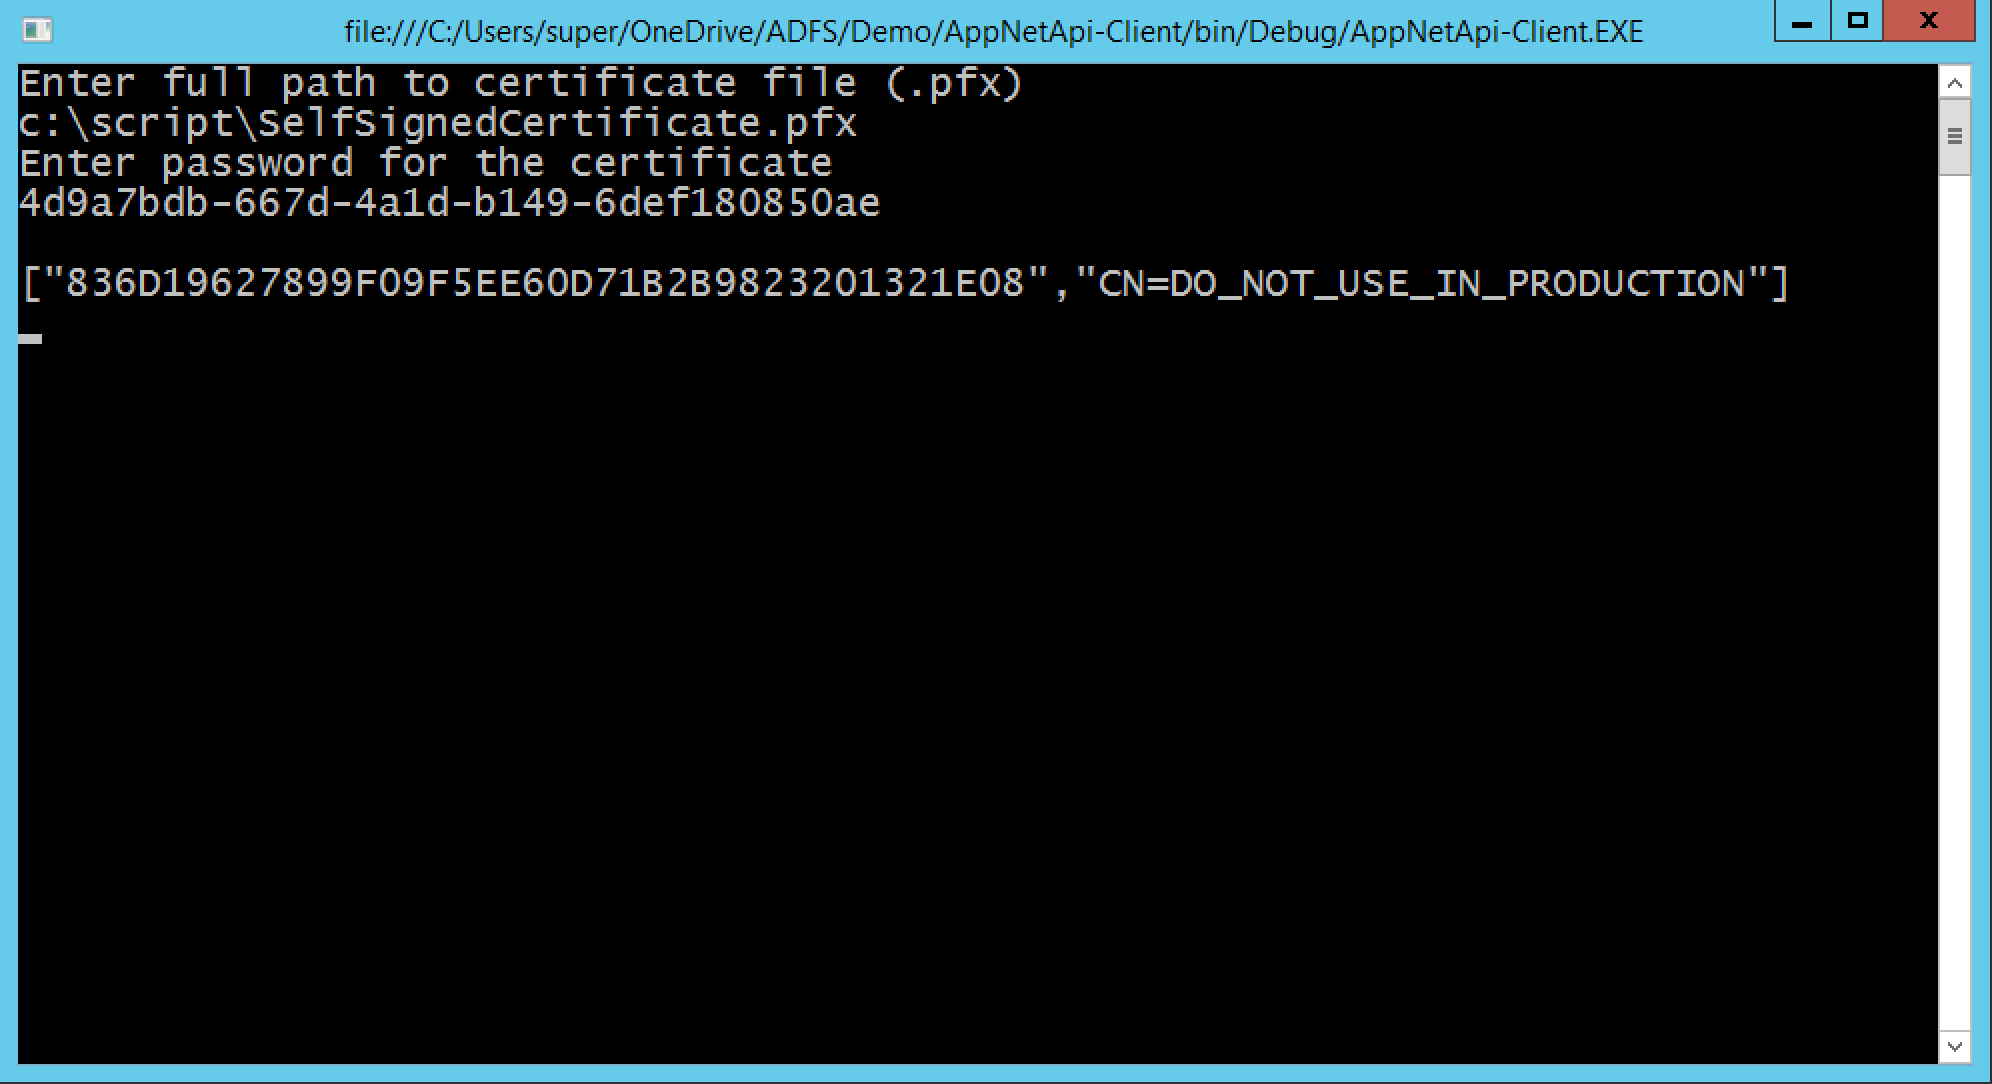
If you notice the response is identical to what you see in previous section when we tested the api call with the browser. It does make sense. Our api is hosted inside azure api app and it does not care how the call is made. It is really agnostic of client making the call but all it requires is client certificate passed to it as part of the request over the tls channel. In fact if you run the same program again and just change baseWebUrl from https to http you will notice the headers in the json response. Its because the server and client won’t have tls handshake so there is no reason for server to expect client certificate either. To sum up always use https when working with client certificates.
Concluding Remarks
Its already long post so like to sum up few key points. You basically should now have a good understanding about how to enable client certificate authentication inside a web api hosted on azure api app and also how various client apps including browser, console etc can call the web api by passing client certificate as part of request. This post has a focus on authentication but we haven’t discussed how you can validate the certificate once it arrived to the server application like a web api. As you might rightly imagine you will never use self signed certificate in production.That’s something very important but does requires bit of detail discussion but in short typically a client certificate are issued by the certificate authorities [ca] that an enterprise trusts. Mostly its an enterpeise internal ca that issues client either an individual or an application a cert which then in turn presents it to the server side application like a web api to establish its identity. The server side application goes back to ca and verify the certificate first. Once certificate is verified next step is to use its attributes to establish client identity and then use that identity to perform authorization. Hopefully these topics can be covered in future posts.

Thanks Razi,
It would be nice if the same could be extended with a ‘put’ example where request body holds encrypted data.
Incredible!! Thanks!